Tuesday, October 27, 2009

Daring Bakers: French Macarons


Boy oh boy, do I have experiences to share and pictures to show you this month with this challenge! But before I get into that, let me introduce our hostess of the October Daring Bakers' Challenge:

The 2009 October Daring Bakers’ challenge was brought to us by Ami S. She chose macarons from Claudia Fleming’s The Last Course: The Desserts of Gramercy Tavern as the challenge recipe.

Our hostess explains what french macarons are:

"In the United States, the term “macaroon” generally refers to a cookie made primarily of coconut. But European macaroons are based on either ground almonds or almond paste, combined with sugar and egg whites. The texture can run from chewy, crunchy or a combination of the two. Frequently, two macaroons are sandwiched together with ganache, buttercream or jam, which can cause the cookies to become more chewy. The flavor possibilities and combinations are nigh endless, allowing infinitely customizable permutations".

I found that the challenge recipe did not work as well as another one that I've been using almost weekly over the past six months. [If you would like to see the actual challenge recipe, click here.]

I followed the directions for the challenge recipe exactly and the results were a disappointing FAIL (see pictures below):


Against my better judgement and previous experience, the parchment paper did not remotely help these poor things. I even baked them on Silpats, just to be sure. This is how they turned out:


And here is a close up of the failed macarons:


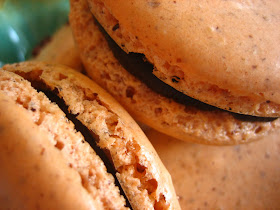
Now this is how macarons SHOULD look (notice the ruffled edges at the bottom of the macaron, these are called feet and you want them for a successful macaron):


I'm not sure if it was because it was a rainy, high-in-moisture Oregon day and this recipe didn't have as much powdered sugar and almonds to the egg white ratio. Also, I have found that parchment paper does NOT work as well as Silpats for my macarons. I did try the double pan technique that was mentioned, and that really didn't help them either. Although, this wasn't a successful first run, I'm glad I tried all the tips and the recipe, if only to know what doesn't work.

As I mentioned above, I've been making French Macarons for the past six months as a collaboration with a local chocolate shop owner and we sell them from his store each Saturday. So I've worked through many recipes over this time and I will share the one that I adapted from a basic recipe found at Tartelette's website. If you haven't visited her website, I highly recommend you do--she is an expert macaron baker and she gives clear and helpful directions and her macarons are beautifully done.

The one aspect I really enjoyed from this challenge was creating a new flavor that I hadn't tried before and I was excited to use some Oregon Hazelnuts that I just purchased here locally from Hazelnut Hill in Corvallis, Oregon.

I've included my own thoughts and notes from things that I've found to work really well in making French Macarons.

*Jillicious notes in this color.


Pumpkin Spice Hazelnut French Macarons

Adapted from Tartelette's Recipe found here.

For the macaron shells:

90 grams egg whites (aged 2-3 days)
1 tsp. lemon juice
30 grams granulated sugar
200 grams powdered sugar
55 grams almond flour
55 grams hazelnut flour
1 tsp. pumpkin pie spice
3 to 5 drops of orange food coloring

Prepare the macarons:

1) In a stand mixer fitted with the whisk attachment, whip the egg whites to a foam, gradually add the sugar until you obtain a glossy meringue. While the egg whites are still at a soft peak, add the food color. Do not over beat your meringue or it will be too dry.

2) Place the almonds, hazelnuts, powdered sugar, and pumpkin pie spice in a food processor and give them a good pulse until the nuts are finely ground.


*After grinding the mixture, it should be fine and look like this:


3) Add them to the meringue, give it a quick fold to break some of the air and then fold the mass carefully until you obtain a batter that falls back on itself after counting to 10. Give quick strokes at first to break the mass and slow down. The whole process should not take more than 50 strokes. Test a small amount on a plate: if the tops flattens on its own you are good to go. If there is a small beak, give the batter a couple of turns.

4) Fill a pastry bag fitted with a plain tip (Ateco #807 or #809) with the batter and pipe small rounds (1.5 inches in diameter) onto silicone mats lined baking sheets. *I usually use a smaller tip Ateco #806--just a preference.


*Because the batter will spread slightly, it's best to pipe macarons in alternating rows as pictured:


5) Preheat the oven to 280F. Let the macarons sit out for 30 minutes to an hour to harden their shells a bit and bake for 15 to 20 minutes, depending on their size. *I have a convection oven and I bake mine for 8-9 minutes, then turn the pans and switch racks and continue to bake for another 8-9 minutes.

6) Let cool. If you have trouble removing the shells, pour a couple of drops of water under the parchment paper while the sheet is still a bit warm and the macarons will lift up more easily do to the moisture. (*This is another reason I use Silpats; once the macarons cool, they come off very easily.) Don't let them sit there in it too long or they will become soggy.

7) Once baked and if you are not using them right away, store them in an airtight container out of the fridge for a couple of days or in the freezer.


Dark Chocolate Hazelnut Ganache

4 oz. dark Belgian chocolate, finely chopped
1/2 cup heavy cream
1/2 tsp. vanilla extract
1/4 cup Nutella

1) Chop chocolate into small pieces and transfer to bowl; set aside.

2) Heat cream over medium-high heat. When it reaches scalding point, remove from heat and pour over chocolate.

3) Stir chocolate and cream until combined. Add vanilla and Nutella and stir until incorporated and smooth. Let ganache cool and is firm enough to pipe on macarons.

4) Pipe ganache on macaron (bottom side facing up) and sandwich carefully with second macaron (top side facing down).


I was very happy with how this version of French Macarons turned out. I really liked the addition of the hazelnut flour to the macaron and the pumpkin pie spice was a nice flavor with it.

The reason I choose to use a dark chocolate and mix it will the Nutella, was because although I like the strong hazelnut flavor of the Nutella, I didn't want it to take over the ganache flavor completely.

In the end, both components complimented each other and I would say that this macaron challenge was a SUCCESS!

Monday, October 26, 2009

Monday Must Have: Le Creuset Pastry Brush

Picture from Sur la Table

I know there are many brands of silicone pastry brushes out there, but my favorite is the Le Creuset brand. I have several brushes in a few colors and each one looks brand new, even though I've had them for years.

Top 5 reasons why the Le Creuset Pastry Brush is a MUST HAVE:
1) Easy to clean & stain proof (the brush is removable from the handle and is dishwasher safe).
2) Heat resistant up to 800 degree F. (You may not ever be dealing with that extreme type of heat, but good to know that if you accidentally leave it in a boiling pot, it won't become part of your food).
3) Great for applying butter or egg wash to pastries; flexible but won't damage even the most delicate doughs.
4) Gentle on bakeware or cookware & will not scratch or leave unwanted bristles (as some synthetic brushes break off at times).
5) AWESOME color choices to match any kitchen!
Picture from Sur la Table
Which is your favorite color and which kitchen task do you use it for?

Wednesday, October 21, 2009

Harvesting the Grapes


After a long summer of canning many fruits and vegetables, the early fall produces one of the last fruits that need to be preserved; GRAPES!

We have put up grape juice for years, ever since I was a little girl. When the leaves begin to turn colors and the nights are cooler (but not yet freezing) it's time to pick them.


Putting up grape juice also happens to be one of the EASIEST canning processes of them all. Because the high heat of the steam, we don't need to process them in a Boiling Water Bath (which is one less step) because the juice is hot enough to seal the lids from the steam process. Plus, it's like my little reward after putting in so many hours of canning and now I can just sit back and let the Steam Juicer do all the work.


Making Grape Juice with a Steam Juicer

1) Fill the bottom pan up to the line with water. *Make sure that you check the water level during the juicing process and add more if necessary. You don't want it to run dry!

2) Wash grapes and drain off excess water before putting them into the steamer. Steams do not need to be removed.


3) Place grapes in the steamer.


*We place them higher than the top, as they will eventually cook down and you won't have to make as many separate batches.


4) As the water in the bottom compartment begins to boil, the steam will cook down the grapes and the middle compartment will begin to collect the juice. Steam over continuously boiling water (medium heat) for about 60-75 minutes, or until all the juice has been extracted from the grapes.


5) Have your prepared quart jars ready (hot and sterilized) for the juice. Using the tube on the side of the steamer, fill the jars, leaving 1/2-inch headspace.

*You'll see some juice begin to fill the tube; don't worry because you have it clipped at the top and if you have the spout pointing up, the juice won't leak out.


*When you get close to filling the jar, use the clip to slow down the juice and be very careful, the juice is VERY HOT and can BURN you which is very painful.


6) Wipe the rim and place lids and bands on the jars. Set on a towel on the counter undisturbed for the next 12 hours to cool and seal.


*We made several types of grape juice (from left to right):
  • The darkest one on the left is a mixture of cherry and grape juices.
  • Then the next three jars are from concord grapes.
  • The next two pinkish ones are also concord grape, but the juices were extracted earlier than the previous three. *The longer you let the grapes steam, the more concentrated (or darker in color) the juice will become.
  • The next two jars are a combination of green and concord grapes.
  • The final two on the end are from the green grapes only, and they make a white grape juice.


Mix Grape Juice:

*Because the grape juice is a concentrate, you will need to add the following:

Add sugar (about a 1/3 to 1/2 cup; to taste)
Add water (about 3 1/2 cups; to taste)

More Juice Ideas:

Use half of the prepared grape juice (with the water and sugar added) with cranberry juice and part 7-up. Very delicious and makes a nice drink for holiday celebrations (it's perfect that the grape juice is ready by Christmas time!)

*We have found that waiting about 3 months before using the juice, helps to develop a stronger flavor and allows the sediment (which is primarily crystals of tartaric acid) to separate from the juice and settle on the bottom of the jar. These are not harmful, just unappealing. When you pour the grape juice into another container, the sediment will stay at the bottom and you can discard it.

Monday, October 19, 2009

Monday Must (Have) Make: Homemade Fruit Syrups

Last week during the early hours of the morning, I was baking some dessert orders and when I looked out the kitchen window, I saw this beautiful sunrise! I quickly grabbed my camera and was able to capture a few pictures of a foggy, yet lovely sunrise.


With the fall season upon us, comfort foods seem to be very appealing and well, yes comforting. One of the things I love to make for dinner, is breakfast. Eggs, bacon, toast, omelets, pancakes, and my favorite Belgian waffles. And what is a delicious topping? Homemade fruit syrups!


Last week, we canned over 40 quarts of grape juice (oh yes, I will be posting about the "fruits of our labors"--don't you just love a good pun?) and to make some room in our freezer for a meat order arriving soon, we decided to juice the frozen cherries we put up last year. Black cherries make a wonderful juice and a tasty syrup. Although we used a juicer/steamer to extract the juices, if you don't own one, you can still make syrup and it's very easy to make.


Cherry Syrup
Adapted from So Easy to Preserve, pg. 225

Yields = About 3 pints

3 cups prepared cherry juice
3 cups sugar
1/2 cup corn syrup
3 Tbsp. lemon juice

To Extract Juice
If you own a juicer/steamer, this is a great way to extract juice from fruits and vegetables. If you don't own one, here is a link that explains how to extract juices using a saucepan.

To Make Syrup
1) Sterilize canning jars. Combine ingredients in a saucepan.
2) Bring to a rolling boil and boil one minute. Remove from heat and skim off foam.
3) Pour into hot half-pint jars, leaving 1/4-inch headspace. Wipe jar rims and adjust lids.
4) Process 10 minutes in a Boiling Water Bath.
*If you will be using syrup right away, you don't need to process in a water bath. When the syrup is cool, store in the refrigerator.


Monday, October 12, 2009

Monday Must Have: The Bench Scraper


Today was a busy day and it included teaching great 4H group of kids (ages 7 to 13 years old) how to make French Galettes & Mini Turnovers, getting the rest of the grapes picked, and putting away the garden hoses and getting ready for the cold weather coming our way.
And this was how my day off went by so fast.

While I was teaching the group how to make Flaky Pastry Dough by hand, one of the parents asked me why I used the bench scraper instead of a pastry cutter. I love it when people ask me this question, because I think that sometimes this handy tool is often overlooked. I explained that ever since I began using one in culinary school, I've never gone back to a pastry cutter, because you can use this handy tool for so many steps in baking.

Here are a few ways you can use the Bench Scraper in your baking & cooking projects:

1) In making pie dough, it cuts cold butter quickly and then when you are finished with making the dough on a cutting board, you can use it to easily scrape up the leftover flour and clean up the board.

2) It's a great tool for dividing bread dough for loaves or rolls.

3) You can cut bars (brownies, shortbread, etc.) easily in a sheet pan, without scratching the pan like a sharp knife would do.

4) It's helpful when transferring delicate desserts to a serving tray or lifting pastries from the pan.

5) It also is a great way to chop some vegetables quickly and then use it to scoop up the cut vegetables to be used in cooking.

*Bench scrapers come in a variety of sizes and materials, I have several white plastic ones that are great for scraping bowls clean and not wasting any batter.

What task do you use your Bench Scraper for and why?

Friday, October 9, 2009

October is the Month of Birthdays


It's all about the birthday cakes this month. Most of the orders for October so far have been birthday cakes. A favorite cake design that many people love to order is the Gift Cake. I think that the idea of cake all wrapped up like a present is very appealing (like getting two for the price of one). I have to admit, it is one of my favorites to make and today's might be my favorite to date. The client ordered it for her friends that were both turning 50 and there was a surprise party being given for them.


She wanted the colors from the invitation to be incorporated in the design on the cake, so we decided on making the main color the apple green from the invitation.


I colored the fondant into the three colors; apple green, sky blue and navy blue and then cut out various sizes of circles.

Since the colors were bright and cheery, I wanted to only add small accents of black and that was in the slightly pearlized black sugar pearl details.


Around the base, I added the three colors (apple green, sky blue & navy blue) to accent the piping with sugar pearls colored to match the fondant circles.


I choose the gold cake board, since it was a nice contrast to the colors and because the recipient's were turning 50, which is usually denoted as the "golden years."


Gift Cake Details:

12-inch square cake is a Dark Chocolate Cake w/White Chocolate Cream Cheese Filling & Vanilla Buttercream Icing.

Last, but not least, here's a little shout out to my sister who also has a birthday today--Happy Birthday Sandi Rae!! I hope you have a great one!

Thursday, October 8, 2009

The Last of the Summer Fruits


Ahhh...fresh seasonal fruits.

It's that time of year when I get ready to change my summer menu to a fall menu. Some desserts are taken off and replaced with more seasonal items. This morning I had to pick up some ingredients for a few cakes I'm making over the next couple of days and I found some beautiful strawberries, raspberries and blackberries that I needed to decorate a white chocolate cheesecake. I think this will probably be one of the last cheesecakes decorated with fresh seasonal fruit until next spring--it almost makes me a little sad, like having to say good-bye to a good friend. But then I think about all the great fall desserts that will be coming back on the menu and it's OK.

I've had to push back the bread baking for a couple of days and once I finish up the cake orders I have, then I will be able to bake some yummy bread (I have a couple of recipes from the BBA book in mind).


On top of the cheesecake is a layer of sweetened whipped cream and decorated with fresh fruits; champagne grapes, strawberries, raspberries, blackberries, blueberries, green & red grapes.

Monday, October 5, 2009

Monday Must Have: The Bread Baker's Apprentice Book


I have a little confession to make.

If you have been following my blog for a little while, you may have remembered me mentioning something about joining a bread baking group about five months ago (or maybe not and now I've pointed out something that I haven't followed through on). This group called The BBA Challenge(Bread Baker's Apprentice) was formed by Nicole at Pinch My Salt and the goal was to make a recipe per week and post about each result.

From the very beginning, it was stressed that although many people would follow a weekly schedule, you could go at any pace that is best for you and your schedule, so don't worry if you didn't bake a recipe every single week. I was very excited and all ready to jump on the bread baking wagon, especially since I owned the book and had made some recipes from it while I was in culinary school. Now, here is another bit of information to add--I also joined the Daring Baker's Kitchen at about the same time and have found that a monthly challenge has worked much better for me and my level of commitment at that time.
Back to my confession.

I made the first bread recipe (LOVED IT), posted about it and then...work and life got busier and I never made it back for the second recipe (if you look at the side bar with the labels, you'll notice there is only (1) BBA post). I used to follow the google discussion groups and other members of the groups blogs for the first month or two, but then I felt SO guilty about not keeping up, that I had to stop. And it's not like I'm even being held accountable for whether or not I'm making any of the breads, but I still feel a twinge of guilt about not following through. I guess I am on the slow, slow, SLOW schedule and have now made a goal to bake at least three more recipes by the end of the year (yep, I think I can perhaps handle one per month).


So what is my point today? Just this. I saw the book on my shelf, looked outside at the overcast, cold, fall-ish weather outside and thought, "Hey, today is a great day to make bread and maybe others would like to know more about this great book." Also, we have some freshly ground hard white wheat that needs to be used (see picture with large container of flour two pictures down). And hey, fresh warm bread straight from the oven? I think I can make that sacrifice on my day off.

Let me introduce or re-introduce (if you are already aware of this book), The Bread Baker's Apprentice, by Peter Reinhart.


This book is a wealth of great information and contains excellent directions for making delicious bread. Even if you haven't had much experience in baking bread, but want to learn and know more, then this book is for you. If you don't have this book, but would like to try a recipe from it, click over to my post about the Anadama Bread recipe. Try it and let me know what you think about it.


I will be making one of the many great recipes from this book today and later this week, I'll post pictures and more information about how it turns out.

In the meantime, I'd love to know what your favorite bread to make is or if you don't make bread, what is your favorite bread to eat?
Happy Bread Baking Monday!