Raise your hand if you have more beans in your garden and you don't know what to do with them all? It seems like every other day it's time to pick the beans again. Up until now all the canning posts have included the Boiling Water Bath method, but today I'm going to show/explain the Pressure Canning method. If you want to can those wonderful green beans, this post is for you!
Pressure canning is the ONLY SAFE METHOD of canning vegetables! I want to be clear on this, especially if this is your first time canning vegetables. It's a great method, but you do want to make sure you follow the directions carefully, to make sure that you are ensuring safe canning practices. If you are wondering why vegetables can't be canned using the Boiling Water Bath method, please continue reading. (I apologize for quoting so much in the next section, but it is such IMPORTANT information that I want to make sure it's completely correct.)
Here is a brief explanation from the book, So Easy to Preserve (pgs. 17 & 18) of how this method works:
"The canning process involves placing foods in jars or cans and heating them to a temperature that destroys microorganisms that could be a health hazard or cause the food to spoil. Canning also inactivates enzymes that could cause the food to spoil. Air is driven from the jar or can during heating and as it cools a vacuum seal is formed. This vacuum seal prevents air from getting back into the food."
"Clostridium botulinum bacteria are the main reason why low-acid food must be pressure canned to be safe. Clostridium botulinum is a common soil microorganism which produces a very deadly toxin or poison. This food poisoning is called botulism."
"The spores of Clostridium botulinum can be destroyed by canning the food at a temperature of 240 degrees F. or above for a specific period of time. Since this temperature is above the boiling point of water, it can only be reached in a pressure canner."
The main differences between most Pressure Canners is they will have a Dial Gauge or a Weighted Gauge. Click here to see more information about these. I used a Weighted Gauge Pressure Canner to can our beans and the directions will be tailored to this type of canner.

Pressure Canned Green Beans
From So Easy to Preserve, pg. 80
1) Select tender, crisp pods. Wash beans.

2) Trim both ends of the beans. *I'm going to show the process we do this and although you could snap the ends of by hand, I've found this works faster for me.
Line up a few beans and have them even on one end, like this:

Then cut the ends off:

This is the set-up I find helpful; I use three flexible cutting boards and the one in the middle is on top of the other two ends. As I cut the bean ends off, I can just slide them over with my knife to one side and then when it gets full, I can discard them into a bowl for compost later.

After cutting the beans into 1 to 2-inch pieces, I slide those onto the other cutting board and when that gets full, they go into a large bowl. Repeat until you've trimmed all your beans.

3) Once your beans are ready to be canned, make sure you have your bottles washed & hot ready for use. Also have a pot of boiling water ready to add the liquid to the beans after they are packed into the jars. This method is referred to as Raw Pack.
4) Add 1/2 tsp. salt to pint jars or 1 tsp. salt to quart jars (I used pint jars this time). Pack beans tightly into hot jars, leaving 1-inch headspace.

5) Fill jar to 1-inch from top with boiling water. Remove air bubbles. Wipe jar rims. Adjust lids and process.
6) Your pressure canner should have 2 to 3-inches of water almost to a boil, as you place your jars inside.
 *Make sure your jars are not touching and that there is 2 to 3-inches of water after you put them all in--you may have to add more or take out some if too much.
7) Fasten the canner lid securely. Leave the weight off the vent port. Turn the heat to high and heat until the water boils and steam flows freely in a funnel-shape from the open vent port. While maintaining the high heat setting, let the steam flow (exhaust) continuously for 10 minutes. *When this process starts, it may start showing more steam, but don't start the 10 minutes until it's steadily steaming, as it shows in the picture below.
8) After this venting, or exhausting, of the canner, place the counterweight on the vent port. The amount of weight you use will depend on the altitude of where you are canning. We are at about 500 feet elevation, which means we use the 10 pound weight gauge. The canner will pressurize during the next 3 to 10 minutes. Start timing the process when the weighted gauge begins to jiggle or rock as the manufacturer describes.
 IMPORTANT: If at any time pressure goes below the recommended amount (if the weight gauge stops moving), bring the canner back to pressure and begin the timing of the process over, from the beginning (using the total original process time). This is important for the safety of the food.
9) When the timed process is completed, turn off the heat, remove the canner from the heat if possible, and let the canner cool down naturally. While it is cooling, it is also de-pressurizing. Do not force cool the canner. Forced cooling may result in food spoilage. Also, DO NOT REMOVE THE WEIGHTED GAUGE YET! Removing the weight before it has de-pressurized, may result in the canner exploding and that could cause some serious burn injuries...or worse.
10) After the canner has cooled (this may take about 30-40 minutes on older canner models, like ours), tilt the weight slightly to make sure no steam escapes before pulling it all the way off. After removing the weight from the vent port, wait another 10 minutes before removing the lid. Remove lid carefully, and transfer jars to a towel on the counter and let them sit undisturbed for the next 12 to 24 hours.

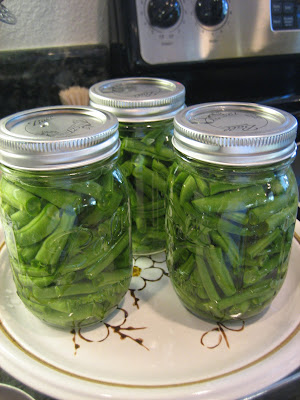
See how delicious these look? They are going to taste so fresh and will be a great side dish for meals. For more information on safe canning practices, visit the National Center for Home Food Preservation website.
If this post has inspired you to do your own canning or want to learn more, don't forget to enter the giveaway here. Scroll down to the bottom and leave your comment for your chance to win this AWESOME canning book: So Easy to Preserve.
Happy Canning!
Happy Canning!


I never remember my mom canning veggies other than pickles. I wonder why? The beans look very good. I love green beans.
ReplyDeleteJeff: Me too!
ReplyDeleteBeautiful; like big green jewels! Good job!
ReplyDeleteJust the Right Size: Thanks! I agree, just like green jewels. :)
ReplyDeletePickles are done in a water bath canner and green beans are done in a pressure cooker. Two very different methods for different types of food. Pressure cookers scare some people because they are afraid they could explode. If you do it the way Jill does it, you will learn to love this method, too! Nothing better than fresh canned green beans!!
ReplyDelete